Table of Contents
1. Proxysmart manual.
1. Brief details
I have developed a software that allows you to run your own 4g proxy farm. It runs on a Linux box (PC) with USB hub and the modems.
Functions:
- IP resets on modems
- WebApp for checking status of each modem
- WEBAPI for actions like querying status, IP rotation, getting used bandwidth for the day, running speedtests
- setting bandwidth quota per modem per month
- bandwidth throttling per modem
- exposing proxy ports, so they are available from world wide
- readingSMS and USSD
- OS spoofing, to simulate TCP fingerprints of: MacOS iOS Windows Android
- custom MTU per modem
- proxy ACLs (what to allow/deny to proxy users)
Basic configuration.
Variables are set /etc/proxysmart/conf.txt.
Each variable has brief description in place.
2. Adding modems
2.1 Adding a new modem (USB)
- remove PIN from the modem’s SIM card and plug in the modem into USB port or USB hub.
- Check whether your modem Web App (e.g. Huawei’s E8372 / E5xxx or ZTE MF79 or Alcatel MW4x ) requires authentication, and if it does, set its admin password to
admin123. Basically to the value of$DEFAULT_HILINK_ADMIN_PASSWORDvariable in/etc/proxysmart/conf.txt. Otherwise many functions will not work, and its IMEI will be detected similarly to2-1.1.2 - Plug in the modem
- wait ~5 minutes or run
sudo proxysmart.sh reset_gently - the modem will appear in the WebApp, click EDIT on it, assign some unique Nickname, HTTP & SOCKS5 ports, Login and Password, then click APPLY
- refresh the WebApp
- done!
2.2. Adding a LAN modem.
Make sure LAN_MODEMS_ENABLE=1 is in /etc/proxysmart/conf.txt.
Configure the server with 2 LAN cards
Assume you have 2 LAN cards, enp6s0 main LAN, enp2s0 is dedicated for LAN modems:
nmcli con
NAME                UUID                                  TYPE      DEVICE
Wired connection 1  bbbee134-51c3-3830-801f-9636470e0708  ethernet  enp6s0
Wired connection 2  000ed912-2d99-3f37-882b-d79ad13102e7  ethernet  enp2s0
- Rename
Wired connection 2→HUBS
nmcli con modify Wired\ connection\ 2 con-name HUBS
- Disable DHCP and IPV6 on HUBS and assign static IPv4 address
nmcli con modify HUBS ipv4.method manual \
    ipv4.addresses 192.168.10.100/24 ipv6.method disabled ipv4.route-metric 300
So you will add the LAN modems to 192.168.10.0/24 network as 192.168.10.1, 192.168.10.2 etc.
systemctl restart NetworkManager
Delete old route
ip ro del default via 192.168.10.1
Confirm you have only 1 default route via main LAN:
ip ro
Output
default via 192.168.1.1 dev enp6s0 proto static metric 100
Add the modem
- Change the modem’s web admin password to something stored in
/etc/proxysmart/conf.txtinDEFAULT_HILINK_ADMIN_PASSWORDvariable. - Change the modem’s IP to something unique e.g.
192.168.10.10 - Put the modem into Ethernet switch routed to the Proxysmart server.
- On the Proxysmart server make sure you can ping the new modem by its IP you set in previous step.
On the server, edit the /etc/proxysmart/lan_modems.yaml file, add a line
- { gw: 192.168.10.10, dev: lanmodem10 }
The line contains its unique IP and the word lanmodem10 ( constructed from a word lanmodem plus a unique number ).
Then either wait 5 minutes or run the command proxysmart reset_gently, it will find new modems. Then , refresh the proxysmart Web App and assign proxy logins and passwords to the new modems.
2.3. Adding a virtual modem (backend proxy).
A virtual modem is a in fact a redirect to a 3rd party proxy (HTTP or SOCKS5) so you can build own proxies based on that and resell them.
They even can be rotated if the backend proxy supports it.
How to add?
Make sure BACKEND_PROXIES_ENABLE=1 is in /etc/proxysmart/conf.txt.
Edit /etc/proxysmart/backend_proxies.yaml , post lines like these:
- id: bproxy1
  creds: http://lll:[email protected]:8100
  ip_reset: 'http://x.x.x.x:8083/api/changeIp?cool'

- id: bproxy2
  creds: https://lll:[email protected]:3129
Where:
- id has to be in the form 'bproxy' + a number
- creds is a line with credentials of the backend proxy
- ip_reset is an optional parameter , the URL for triggering IP rotation of the backend proxy
Then either wait 5 minutes or run the command proxysmart reset_gently, it will find new modems. Then , refresh the proxysmart Web App and assign proxy logins and passwords to the new modems.
3. Proxy credentials for new modems
When adding new modems, please use
- unique HTTP ports from 8001 to 8999,
- unique SOCKS ports from 5001 to 5999.
If you want different ports ranges, update firewall.conf accordingly.
- please use unique nicknames like
dongleXXXor whatever else. Don’t use nicknames likerandomXXX, that are assigned automatically.
4. Where is WebApp
One of
- http://localhost:8080/
- http://LAN_IP:8080/
- http://VPS_IP:8080/
By default login/password are proxy / proxy.
5. How to use proxies
- If proxy ports are forwarded via remote cloud VPS: then the proxies can be used from all over the Internet, by that VPS IP and proxy port numbers.
- From the same LAN where multimodem server is located: by the server’s LAN IP and proxy port numbers.
6. Get list of all modems & their external IPs
Run: proxysmart.sh show_status for table-alike output.
7. Reconfigure all modems & proxies.
Run: proxysmart.sh reset_complete
It is done after reboot automatically by a Cron job.
8. How to change proxy credentials for a modem. How to rename a modem.
WebApp method
- click EDIT on a modem, set new port or password or nickname for a modem
- click APPLY
9. Reset (change) IP on a modem.
The options are below.
- From Web App
Click Reset Ip button.
- From command line.
Run: proxysmart.sh reset_quick_nick dongle1
Where dongle1 is a Dongle “nickname” that is seen from output of proxysmart.sh show_status
- From Web API.
check WEB API section of this manual.
How to rotate a modem periodically?
- WebApp method
Update modem’s settings in the WebApp and click APPLY.
For global setting, edit /etc/proxysmart/conf.txt and set AUTO_IP_ROTATION=5 in order to rotate each modem every 5th minute. If set to 0, automatic IP rotation is not done. You can also set hourly rotation, set 120 for every 2h rotation.
- Cron method
Install a Cron job. Edit a file /etc/cron.d/proxysmart, add a line ( or uncomment a commented line.. )
*/10 * * * * root run-one /usr/local/bin/proxysmart.sh reset_quick_nick dongle3
so that a modem with the Nickname dongle3 is rotated every 10 min.
Repeat for each modem you want to rotate periodically.
10. How many modems can I run on a single computer?
Hi , technically it depends on how powerful this PC is, and how intensively proxies are used.
- Raspberry PI - 4 proxies (roughly)
- a miniPC (Intel NUC or similar) - up to 10
- a Laptop like Core i5 - up to 30.
Also it depends on what Plan you buy.
Also it depends on USB configuration, for maximum number of modems:
- disable USB3.0 in BIOS
- use USB2.0 hubs
11. How to set TTL and why?
In some cases custom TTL must be set in order to have Cell Operator think we are not using the modem in hotsport tethering mode. I.e. we don’t share its data. By default Linux OS has ttl = 64. To change Cell Operator perception of the situation, we want to set it +1 i.e. 65.
Edit /etc/proxysmart/conf.txt and set CUSTOM_TTL_SET=1 and CUSTOM_TTL_VALUE=65 and regenerate settings.
12. How to set MTU and why?
In some cases different MTU values connect with different types of ISP’s. You may want to change it.
Mtu can be only lowered. E.g. if you have MTU 1390, you can set 1340. Not opposite.
- Edit /etc/proxysmart/conf.txt and set CUSTOM_MTU_SET=1 .
- Set MTU in the WebApp for each modem.
13. How to set extra settings for a modem.
Those are optional and are set in the WebApp
- WHITELIST - allowed customers IP’s who are not required to type in proxy password (IP-based auth).
- bandwidth (speed) limit. Values are in bits per second. E.g. 2/2 mbps will be 2000000/2000000.
- DENIED_SITES_ENABLE (1 or 0) and DENIED_SITES_LIST (list of blocked sites patterns).
- Bandwidth Quota, (in Megabytes)
- MTU
14. How can I access the web interface admin panel of each modem?
Open WebApp. Locate the modem. Configure a proxy on your desktop browser.
Use proxy login & password as desribed below (14.1 chapter).
Visit modem IP via that proxy.
14.1. How can I prevent access to modems web interface via proxy?
Since 2023-09-10 it is enabled by default.
Edit /etc/proxysmart/conf.txt and set
PROXY_ADMIN_ENABLE=1
PROXY_ADMIN_LOGIN=SuperAdmin
PROXY_ADMIN_PASS=Hqmz81mmZr
And regenerate configs. So only admin user is allowed to use modems web interfaces, and normal proxy users are not.
15. How to set monthly traffic quota per modem?
In the WebApp, set monthly traffic quota. Click EDIT & APPLY.
16. How to make my proxes Open (i.e. not requiring authentication )
Set OPEN_PROXIES=1 in /etc/proxysmart/conf.txt and regenerate all configs.
Note, when proxy ports are forrwarded via a VPS, the proxies are available to any internet user. Use it with caution.
17. Get monthly/daily proxy usage.
Click bandwitdh stats in the WebApp, or run proxysmart.sh bandwidth_report_json dongleXXX, you will see these columns:
- “bandwidth_bytes_day_in”
- “bandwidth_bytes_day_out”
- “bandwidth_bytes_month_in”
- “bandwidth_bytes_month_out”
- “bandwidth_bytes_yesterday_in”
- “bandwidth_bytes_yesterday_out”
18. How to get current number of connections for a modem?
Run a command
ss -o state established | grep -c :8038
But change 8038 with HTTP port of a desired proxy
19. How to read SMS from a modem.
You have these options.
- Browse to the modem IP ( it is shown as GW in
proxysmart.sh show_status) through the proxy. Click SMS button. - run
proxysmart.sh list_sms_for_a_modem_by_imei_json 999999999999999i.e. IMEI of required modem. - Click SMS in the WebApp
20. How to change WebApp password
By default it is set to proxy / proxy. The password sits on the server’s folder /etc/nginx/. It Can be updated from the Terminal , with the command as follows:
sudo htpasswd -b /etc/nginx/htpasswd proxy NewAweSomePassword999999
Then it will ask for password for current Ubuntu user.
If you want to change username as well, just delete the file and then assign new password
sudo rm /etc/nginx/htpasswd
sudo htpasswd -b /etc/nginx/htpasswd MyNewUsername NewAweSomePassword999999
How to change WEB port
edit /etc/nginx/sites-enabled/proxysmart.nginx and set other port and restart Nginx.
21. OS Spoofing
Os Spoofing is used to simulate other OS TCP fingerprints, MacOS iOS Windows Android
How to enable OS Spoofing?
In the WebApp set destination OS per each modem.
How to test OS Spoofing ?
Visit one of these websites (IP checkers) through a proxy. Find something like “OS TCP fingerprints”.
- http://witch.valdikss.org.ru/
- https://thesafety.us/
- https://Whoer.net , extended results
- https://browserleaks.com/ip
What OS can I spoof?
MacOS iOS Windows Android
Can I dump OS TCP fingerprint from a real device and use it?
Yes, contact me.
I enabled OS TCP spoofing, but it is not working!
The reason may be that the operator passes all traffic through its internal proxy, or in other way modifies TCP signatures. Then local OS TCP modifications are overwritten. Is it bad? No! Because still traffic looks natural as it was coming from this operator network.
Try other operator.
22. Performance tuning
When >10 modems are added, and when modem list is generated slowly, play with MAX_PARALLEL_WORKERS_STATUS variable, e.g. set it to 2 or 4. On faster CPU’s it can be set to 8.
Also try to disable OS TCP reporting, i.e. set ENABLE_VALDIK=0 in /etc/proxysmart/conf.txt. It will also make modem list generation faster.
Also you can disable detailed status, set QUICK_STATUS=1 in /etc/proxysmart/conf.txt & refresh the WebApp.
23. How to lock network mode per modem
Set TARGET_MODE in its settings in the Proxysmart WebApp. Allowed values:
- auto
- 3g
- 4g
24. What if a modem connected via 3G or 2G, and I want 4G?
Rotate its IP.
25. I want to add extra users to a proxy
In the WebApp, click EDIT on a modem, add some extra users, click APPLY.
26. Is IPV6 supported?
Yes but it’s off by default.
On modems , edit APN and set APN type for both IPv4 and IPv6 , e.g. Ip4Ip6 or Ip4+ip6, there is a dropdown list for that.
On Proxysmart box: Update /etc/proxysmart/conf.txt with
ALTNETWORKING_VERSION=2IPV6_SUPPORT=1
and reset configuration proxysmart.sh reset_complete ; or even better do a reboot.
27. Nagios integration.
There is a plugin embedded, run it as root,
/usr/lib/nagios/plugins/proxysmart-nagios-helper.sh IMEI
or
/usr/lib/nagios/plugins/proxysmart-nagios-helper.sh NICKNAME
so it will return OK/WARN/CRIT/UNKNOWN and corresponding exit code.
28. Secure (anonymous) IP rotation links.
These links
- Can be safely passed to your customers. They don’t reveal real dongle parameters like IMEI or Nickname.
- They don’t require HTTP basic authentication
- They have limited lifetime , it is set in
/etc/proxysmart/conf.txtasRESET_LINK_VALIDITYvariable, (default value : 5 years). - They depend on proxy password. So, when you change proxy password - old IP rotation links will stop working.
A link can be retrieved this way: Open dongle status (click on its IMEI!) in the WebApp, take RESET_SECURE_LINK→URL value.
If you realized you gave a link to a customer, and want to revoke it, just set new password for the proxy.
If you want to invalidate all links of all modems, set a new secret: set RESET_LINK_SECRET in /etc/proxysmart/conf.txt .
29. QUIC (UDP) support on Socks5 proxies, for HTTP/3.0
It is needed for proper work of HTTP/3.0 which uses UDP.
QUIC (UDP over socks5) will work either in your LAN or via a VPS. Steps are below.
Steps on VPS :
Run:
install logrotate rule so Gost logs won’t fill up the disk space.
echo '
/var/log/gost/*.log {
    missingok
    compress
    notifempty
    hourly
    rotate 48
    copytruncate
}
' > /etc/logrotate.d/gost

echo '35 * * * * root /usr/sbin/logrotate -v /etc/logrotate.d/gost' > /etc/cron.d/gost-logrotate
Install sudoers so proxysmart server can run commands with sudo on the VPS:
echo 'fwd  ALL=NOPASSWD:  ALL' >  /etc/sudoers.d/proxysmart
chmod 400 /etc/sudoers.d/proxysmart
usermod -s /bin/bash fwd
Install Gost v2
ARCH=linux-amd64
VER=2.11.3
curl -L -o /tmp/gost.gz https://github.com/ginuerzh/gost/releases/download/v$VER/gost-$ARCH-$VER.gz
gunzip -dc /tmp/gost.gz  > /usr/local/bin/gost.new
chmod 755 /usr/local/bin/gost.new
mv  /usr/local/bin/gost.new /usr/local/bin/gost
gost -V
Install Gost v3
VER=3.0.0-rc8
ARCH=linux_amd64
URL="https://github.com/go-gost/gost/releases/download/v$VER/gost_${VER}_$ARCH.tar.gz";
D=`mktemp -d`;
( cd $D;
  curl -L -o /tmp/gost3.tgz "$URL";
  tar xf /tmp/gost3.tgz gost;
  mv gost /usr/local/bin/gost3.new
  );
rm -rf $D;
chmod 755 /usr/local/bin/gost3.new;
mv /usr/local/bin/gost3.new /usr/local/bin/gost3;
gost3 -V
if Haproxy is not installed, do nothing.
if Haproxy installed: free up SOCKS ports (5xxx) from Haproxy: edit /etc/haproxy/haproxy.cfg and delete section frontend fe_SOCKS5 and restart it systemctl restart haproxy.service
Steps on Proxysmart server :
set in /etc/proxysmart/conf.txt :
QUIC_SUPPORT=1GOST_VER=gost
and run proxysmart.sh reset_complete.
Note: make sure the VPS has enough RAM, each proxy needs 50MB of RAM. Also add swap if needed.
29. “Dirty” IP reset.
It may be needed when you need even faster IP reset. In this case, post-checks are not made, so it is not sure if the modem really went online after IP reset. It can be activated by DIRTY_IP_ROTATION=1 in /etc/proxysmart/conf.txt.
30. Exclude some modems
In /etc/proxysmart/conf.txt
- by Device name, populate this array
IGNORED_DEV=( modem132 modem0000000002)– array of Network Interfaces that are not processed - by IMEI, populate this array
IGNORED_IMEI=( 9999999999999999 8888888888888888 )– array of IMEI that are not processed
31. Use custom Speedtest server.
It is useful when for some reason you want to run speed tests towards a custom server, instead of Ookla servers. So set up a Apache web server with a large file (500MB) and get 2 URL’s, one will test download and 2nd will test upload. The latter must accept large POST data.
The commands to setup a server part
apt install apache2
dd if=/dev/urandom  of=/var/www/html/file.bin bs=1M count=500
Update /etc/proxysmart/conf.txt with IP of the WEB server:
SPEEDTEST_CUSTOM=1
DL_URL=http://$VPS/file.bin
UL_URL=http://$VPS/i.php
32. Minimum time between IP rotations
If you want to avoid too frequent IP rotations triggered by your users – set MINIMUM_TIME_BETWEEN_ROTATIONS=120 e.g. for 120 seconds minimum delay in /etc/proxysmart/conf.txt .
33. How to block domains
- Check (enable)
DENIED_SITES_ENABLEin the WebApp DENIED_SITES_LISTis a list of domains that will be blocked, both HTTP and HTTPS, plus their subdomains. E.g. if you listporn.com, then alsowww1.porn.com,www.porn.com,porn.comare blocked.
Note for Socks5 proxies
When a domain blacklist is imposed, then by default users still can access blocked sites by their IP’s.
In order to prevent it, set DENY_IP_REQUESTS=1 and VERSION_3PROXY=0.9 in /etc/proxysmart/conf.txt and run proxysmart.sh reset_complete for resetting all configuration.
33.a. How to allow only whitelisted domains.
- Check (enable)
WHITELIST_SITES_ENABLEin the WebApp WHITELIST_SITES_LISTis a list of domains that are allowed, while other are blocked. Both HTTP and HTTPS, plus their subdomains. E.g. if you listbbc.com, then alsowww.bbc.com,www1.bbc.comare listed.
34. How to re-rotate IP when IP doesn’t change?
In /etc/proxysmart/conf.txt set RETRY_IP_ROTATIONS=1 .
So when Old_IP == New_IP, then IP rotation is retried. Up to MAX_RETRY_IP_ROTATIONS attempts which is by default 3.
34.1 Prevent non-unique IP’s after IP rotation.
For example to prevent using IP’s that were in use 1 time (or more) within last 24h: set in /etc/proxysmart/conf.txt :
RETRY_IP_ROTATIONS=1                 # enables Re-rotation
NON_UNIQUE_IP_OCCURS="1"             # how many times an IP must occur to be considered NonUnique. E.g. 1
NON_UNIQUE_IP_PERIOD="24hour"        # during which period an IP must occur to be considered NonUnique. E.g. 1day or 1hour
35. How to forward proxy ports using HAproxy?
Why? In order to enable client IP whitelisting, i.e. 3proxy on proxysmart server will see original client IP and will be able to use whitelising.
Steps:
1. On Proxysmart server
- set
PROXY_PORTS_FORWARDER_SOFTWARE=ssh+haproxyin/etc/proxysmart/conf.txt - run
proxysmart.sh reset_completefor resetting all configuration.
2. On the VPS
Run apt install haproxy rsyslog
3. Copy Haproxy and Syslog conf files from the Proxysmart server files to the VPS
scp them from the Proxysmart server to the VPS. $VPS variable is sourced from the conf.txt
source /etc/proxysmart/conf.txt
cd /usr/share/doc/proxysmart/examples/haproxy_integration/
scp etc/haproxy/haproxy.* $VPS:/etc/haproxy/
scp etc/rsyslog.d/49-haproxy.conf $VPS:/etc/rsyslog.d/
4. On the VPS
Run
touch /var/log/haproxy.log
chown syslog:syslog /var/log/haproxy.log

systemctl restart rsyslog.service
systemctl restart haproxy.service
systemctl status haproxy.service
Must be green and show active(running).
5. Post check
Test a proxy via VPS IP and you will original client IP in 3proxy logs.
36. How to use newer 3proxy version 0.9 ?
Edit /etc/proxysmart/conf.txt , set VERSION_3PROXY=0.9 , run proxysmart.sh reset_complete.
37. Where are proxy logs.
On the Proxysmart server in a folder /var/log/3proxy/ , each filename is named for HTTP proxy port.
Logs are rotated daily and 90 copies are saved, details are in /etc/logrotate.d/3proxy.
Logs of IP rotations are in a folder /var/log/proxysmart/dongle_rotations/.
37.1. No logs policy
If you want to run NoLogs policy, create a cron script that deletes the logs, i.e. the files
/var/log/gost/*
/var/log/3proxy/*
/var/log/sniproxy*
/var/log/haproxy*
38. My proxies are slow.
Assume a chain UsbModem→PC→VPS→ProxyUser. Final Proxy speed is limited by:
Download speed of the modem.
It can be measured on the side of the PC e.g. in the Proxysmart WebApp by clicking the Speedtest button.
How to improve it?
- try other carriers
- try other modems
- try better location with better signal
Upload speed from PC to VPS.
Normally it correlates with quality of home internet (Fiber/xDSL) and can be measured by running speedtest on the PC in browser or in Terminal (speedtest-cli). Upload value has to be high.
How to improve it?
- get a better home internet with better upload
- switch from WiFi to Ethernet
Download speed from VPS to the ProxyUser
It can be measured by downloading a file from VPS to the Proxyuser.
How to improve it?
- Change location of the VPS to a Cloud Hoster that has better reachability to the clients from all over the world
39. My proxies are slower than the same SIM card in a Phone.
Reason 1: Compare LTE category of the modem and the phone. Phone has higher LTE cat e.g. 12..20, while modem has LTE cat 4..6 (depends).
Reason 2: when the speed is really bad (about 1mbps) then it is Operator's throttling. Perhaps you bought a plan that allows only phones/tablets and doesn't allow modems.
40. How to forward proxy ports via each modem individually?
Why is it needed? When home base internet is unstable or its upload speed <15mbps.
A VPS is needed in order to expose the ports this way ( see VPS integration chapter ).
How it works
Each proxy forwards its port through its modem, not using base internet.
PRO's :
- Home base internet speed & stability is not important
CON's :
- each modem is working in bidirectional mode
- proxy speed is limited to 4G Upload speed which is slow
Steps: on Proxysmart server
- set
PROXY_PORTS_FORWARDER_TYPE=cellin/etc/proxysmart/conf.txt - run
proxysmart.sh reset_completefor resetting all configuration.
41. Auto-rebooting modems.
Sometimes only a reboot can fix a modem. In order to enable, set AUTOREBOOT_DONGLES=1 in /etc/proxysmart/conf.txt. How it works:
- if a situation occurs , “reboot score” of a modem is increased by the value, according to the situation:
SCORE_IP_ROTATION_FAIL=10                   # score increments when IP rotation failed
SCORE_IP_NOT_DETECTED=2                     # score increments when IP not detected
SCORE_IP_RECONNECT_FAIL=10                  # score increments when IP not auto-reconnected
SCORE_WWAN_DATA_FAIL=10                     # score increments when WWAN device can't establish Data connection
SCORE_WEBAPP_FAIL=20                        # score increments when the modem's WebApp is stuck
- when the modem’s reboot score reaches
MAX_REBOOT_SCOREthen the modem is rebooted. - special case, do USB reset instead of a reboot, when
AUTO_USB_RESET_DONGLESis 1, it is useful when modems’ WEB APP is not available.
42. My proxy is offline and showing Red in the WebApp.
Check if the modem has good signal.
Check if the modem has correct APN (set in its Web Dashboard).
Check if its SIM card is active (not blocked on Operator side) and is topped up.
Check the modem on another PC (e.g. your own desktop).
43. Parallel processing of modems.
Edit /etc/proxysmart/conf.txt , set PARALLEL_STARTUP=1 .
So the modems are processed in parallel, in the number of threads defined in MAX_PARALLEL_WORKERS_STATUS variable (default 8).
44. IP's are rotated on their own
If you don't rotate IP's and they are detected each time as a new IP - it is natural behaviour of mobile provider, when it routes its clients through random different gateways every 1 minute or so. T-Mobile USA is known of doing so.
45. Install logging of all requests in single place
*the Goal*
Get single log of all requests from Proxies (HTTP/Socks5) clients and VPN clients.
Installation On Proxysmart server
Edit /etc/proxysmart/conf.txt , set SNIFFER_ENABLED=1 .
run proxysmart.sh reset_complete
Watch the log /var/log/proxy_log.log on Proxysmart server.
It is rotated and 365 daily copies are stored on disk.
It can also be installed on a VPS if the VPS is working as proxies frontend.
Installation On VPS
Required files (copy from Proxysmart server to the VPS):
/usr/local/bin/proxy_log.sh
/etc/systemd/system/proxy_log.service
/etc/logrotate.d/proxy_log
run :
apt update && apt install tshark
systemctl enable proxy_log --now
Watch the log /var/log/proxy_log.log on VPS.
Log format
File: /var/log/proxy_log.log
    _ws.col.Time  frame.interface_name   ip.src  tcp.srcport   ip.dst   tcp.dstport
    #   1          2                        3       4           5           6

    socks.remote_name    socks.dst    socks.port   socks.dstport
    # 7                         8         9         10

     http.request.method    http.host
    #   11                  12

     tls.handshake.extensions_server_name  x509ce.dNSName
    #   13                                  14
46. PPP modems
These are very old 3g modems like Huawei E303, E173, E156; ZTE MF110, MF193, MF190. In order to make them work with proxysmart,
edit /etc/proxysmart/conf.txt and set PPP_MODEMS_ENABLE=1 .
Make Quectel LTE modules work in PPP mode
Why? sometimes they fail working in QMI mode. So:
- edit
/etc/proxysmart/conf.txtand setPPP_MODEMS_ENABLE=1 - place a file
/etc/udev/rules.d/21-wwan.rules
# ignore QMI_WWAN endpoints on Quectel, to make it work in PPP mode.
SUBSYSTEM=="net", ACTION=="add",  ATTRS{idVendor}=="2c7c" , ATTRS{idProduct}=="0125",  ENV{.LOCAL_ifNum}=="04", PROGRAM="/usr/local/bin/usb_ignore.sh %p"
- re-plug Quectel modems or reboot Proxysmart server
2. Project description
1. project architecture (clients, servers, websites),
- onsite: box with Ubuntu, USB hub and modems
- remote: VPS with proxy ports (optional)
2. Online services are used:
- http://ip.tanatos.org/ip.php which is simple PHP script that returns visitor’s IP. It is used to detect whether a modem is really online. Can be replaced with one of https://ifconfig.co or similar, but I was not happy with their reliabiality, they are down sometimes. The URL is defined in
/etc/proxysmart/conf.txt. - http://witch.valdikss.org.ru/ : used for detecting p0f and MTU
3. CLI API
1. show status
Show full status of all modems, table (slower).
# proxysmart.sh show_status
Show brief status of all modems, table, (faster)
Run
# proxysmart.sh show_status_brief
Show full status of all modems , json
# proxysmart.sh show_status_json
Show status for a single modem, JSON
# proxysmart.sh show_single_status_json dongle111
2. full reconfiguration
3. apply setting for a modem by IMEI
JSON output
# proxysmart.sh apply_settings_for_a_modem_by_imei 868723023562406
Plain text output.
proxysmart.sh apply_settings_for_a_modem_by_imei_raw 359999999999999
4. reset IP on a modem
Args: IMEI or NICKNAME.
JSON output:
# proxysmart.sh   reset_modem_by_imei    899999999999999
# proxysmart.sh   reset_modem_by_imei    Dongle222
Plain text output:
# proxysmart.sh  reset_quick_nick  899999999999999
# proxysmart.sh  reset_quick_nick  Dongle222
5. reboot a modem
6.1. Reset a modem via USB
6. Run speedtest on all modems at once
# proxysmart.sh speedtest all
7. report bandwitdh
8. reset bandwidth counter on a modem
9. list sms on a modem
10. send sms
11. purge SMS
12. send ussd
13. get bandwidth counters from a modem
..use bandwidth stats..
14. Get IP rotations log for a modem
15. Get Top hosts from a modem
16. Report IP uniqueness
4. WEB API
1. Web API description.
WEB API endpoint is the URL that Proxysmart WebApp available at.
It can be - LAN_IP:8080 when you call it from the same LAN - VPS_IP:8080 when you forwardded ports to the Cloud VPS - STATIC_IP:8080 when you forwarded ports via your LAN router and your ISP gave you STATIC_IP
Also attach proper username:password (the -u parameter).
Whenever below you are seeing localhost:8080, replace it with the actual WEB API endpoint.
2. List all modems ( full status, slow)
3. List all modems ( brief status, fast )
4. Single modem status
Request:
( either by IMEI or Nickname )
curl http://localhost:8080/apix/show_single_status_json?arg=dongle111    -u proxy:proxy
curl http://localhost:8080/apix/show_single_status_json?arg=899999999999999    -u proxy:proxy
5. Reset (change) IP on a modem.
Request:
( either by IMEI or Nickname )
curl http://localhost:8080/apix/reset_modem_by_imei?IMEI=899999999999999 -u proxy:proxy
curl http://localhost:8080/apix/reset_modem_by_nick?NICK=dongle22 -u proxy:proxy
6. Reboot a modem
Request:
( either by IMEI or Nickname )
curl http://localhost:8080/apix/reboot_modem_by_imei -d IMEI=860493043888886 -u proxy:proxy
curl http://localhost:8080/apix/reboot_modem_by_nick -d NICK=dongle2 -u proxy:proxy
ETA: ~ 1.5 minute
7. Send SMS
Request:
curl 'http://localhost:8080/modem/send-sms' -u proxy:proxy \
    --data-urlencode 'imei=899999999999999' \
    --data-urlencode 'phone=+11111111111' \
    --data-urlencode "sms=txt txt fff"
8. Send USSD and read response
Request:
curl 'http://localhost:8080/modem/send-ussd' -u proxy:proxy \
    --data-urlencode 'imei=899999999999999' --data-urlencode 'ussd=*100#'
9. Read SMS from a modem
10. Read bandwidth stats from a modem
Request:
curl localhost:8080/apix/bandwidth_report_json?IMEI=899999999999999 -u proxy:proxy
With arbitrary time interval:
Request:
curl -G http://localhost:8080/apix/get_counters_imei -X GET -d IMEI=868888888888888 --data-urlencode 'START=2023-01-28 18:10' --data-urlencode 'END=2023-01-28 19:20:01' -u proxy:proxy
11. del
12. Reset bandwidth stats for a modem
Request (by IMEI or nickname):
curl localhost:8080/apix/bandwidth_reset_counter?arg=dongle111    -u proxy:proxy
curl localhost:8080/apix/bandwidth_reset_counter?arg=2727233671671676    -u proxy:proxy
Response:
{"result":"success","debug":null}
13. Reset a modem via USB
Request either - by network interface e.g. modem77 - by Nickname - by IMEI
curl localhost:8080/apix/usb_reset_modem_json?arg=modem77      -u proxy:proxy
curl localhost:8080/apix/usb_reset_modem_json?arg=dongle22      -u proxy:proxy
curl localhost:8080/apix/usb_reset_modem_json?arg=868888888888889      -u proxy:proxy
14. Get IP rotations log for a modem
Request - by Nickname - by IMEI
curl localhost:8080/apix/get_rotation_log?arg=899999999999999  -u proxy:proxy
curl localhost:8080/apix/get_rotation_log?arg=dongle2          -u proxy:proxy
15. Apply settings for a modem
16. Purge SMS from a modem
Request either - by Nickname - by IMEI
curl localhost:8080/apix/purge_sms_json?arg=Nick77      -u proxy:proxy
curl localhost:8080/apix/purge_sms_json?arg=868888888888889      -u proxy:proxy
Response:
{ "result": "success", "msg": "" }
17. Get Top hosts from a modem
18. Report IP uniquness
19. Store a modem object in Mongodb
This call just stores the object. Then you have to call “Apply Settings for a modem”.
Get all possible fields in the Mongodb schema description.
20. Export backup
Destination format: v1
So it can be later imported in V1 version of Proxysmart.
Destination format: v2
So it can be later imported in V2 version of Proxysmart.
5. Mongodb integration
Mongodb contains a collection modems with elements, 1 element = 1 modem.
Mandatory fields are
- IMEI
- name
- http_port
- socks_port
- proxy_login
- proxy_password
Other fields are optional.
After editing a record in Mongodb, apply settings for the edited modem ( /modem/settings WEB API call).
5.1. Mongodb schema
Sample file modems.json with 2 modems. 1st modem: only mandatory fields. 2nd modem: also arbitrary fields.
Notes:
- bw_quota : bandwidth quota in MB
- PROXY_VALID_BEFORE: expiry of a port
- CONNLIM: number of allowed new connnections during 1 minute
- bandlimin: upload speed (from proxy user perspective), bits/second
- bandlimout: download speed (from proxy user perspective), bits/second
- TARGET_MODE - the mode (3g/4g/auto/default) the mode will work in.
- OS - spoofed destination OS, can be
- (empty or absent field) No spoofing
- “android:1” Android, p0f compliant but slow
- “android:3” real Android, almost like Linux
- “macosx:3” macosx:3
- “macosx:4” real MacOSX 12.6 / iPhone 13 Pro Max
- “ios:1” ios:1, p0f compliant
- “ios:2” ios:2, real Iphone
- “windows:1” real Windows 10
5.2. Moving Mongodb to other server
Sometimes you want to move Mongodb to a cloud server.
In order to do so
- keep collection name
modems - if your new mongodb is Mongodb 5+ and doesn’t have backward compatibility with the older clients, upgrade Mongodb Client to 5th version. Run on the Proxysmart box:
apt purge mongo\* -y
. /etc/os-release
rm -f /etc/apt/sources.list.d/mongodb*
curl -L https://www.mongodb.org/static/pgp/server-5.0.asc | gpg --dearmor | sudo dd of=/etc/apt/trusted.gpg.d/mongodb-5.0.gpg
echo "deb [ arch=amd64,arm64 ] https://repo.mongodb.org/apt/ubuntu $VERSION_CODENAME/mongodb-org/5.0 multiverse" | sudo tee /etc/apt/sources.list.d/mongodb-org-5.0.list
apt-get update
apt install mongodb-mongosh mongodb-database-tools -y
ln -sf /usr/bin/mongosh /usr/local/bin/mongo
- update
MONGODB_URIto new Mongodb URI in/etc/proxysmart/conf.txt - if your new mongodb URI has +srv extension , install a PIP module:
/var/www/proxysmart/venv/bin/pip install "pymongo[srv]" - test new Mongodb URI (I assume you updated
MONGODB_URIvariable inconf.txtabove):
    . /etc/proxysmart/conf.txt;
    mongoexport --quiet --uri="$MONGODB_URI" -c modems --forceTableScan
it should return array of all elements in the modems collection
systemctl restart proxysmartproxysmart.sh reset_complete
6. Installation
1. Initial installation
Install a fresh OS.
Supported OS and architectures:
- Ubuntu 22.04, 20.04 on amd64, arm64.
- Debian 11 or Raspberry PI OS (ex-Raspbian) on amd64, arm64, armhf ( see Raspberry PI OS Notes below).
- Raspberry PI : https://ubuntu.com/download/raspberry-pi , choose Ubuntu Server 22.04 64bit
- Normal PC/laptop: Choose Server or Desktop, https://ubuntu.com/download, choose Ubuntu 22.04
Armhf (arm 32 bit) doesn’t have Mongodb support!
Those steps will take 5..10 minutes.
Unplug any 4g modems.
Add an APT repo.
wget -O-  https://pathos.tanatos.org/proxysmart.apt.repo/GPG.txt | \
    gpg --dearmor | sudo dd of=/etc/apt/trusted.gpg.d/proxysmart.gpg

source /etc/os-release
ARCH=$(dpkg --print-architecture)

echo "deb [arch=$ARCH] http://pathos.tanatos.org/proxysmart.apt.repo $VERSION_CODENAME main" \
    | sudo tee /etc/apt/sources.list.d/proxysmart.list

sudo apt update
sudo apt install proxysmart
Then follow instructions: It will tell what to do next ( run 2 files ).
sudo /usr/lib/proxysmart/install_pkgs.sh
sudo /usr/lib/proxysmart/install_webapp.sh
Reboot or run sudo proxysmart.sh reset_complete.
After that either enjoy the Demo version at http://localhost:8080 or check License section.
Rockpi Notes
If LOGRAM is enabled ( a folder /var/log.hdd exists). Disable logging:
- mongodb, edit
/etc/mongodb.conf, commentlogpathdirective.
Raspberry PI OS (ex-Raspbian) Notes
its kernel doesn't have xt_cgroup module , so you have to rebuild its kernel and include this module. It is recommended to switch to Ubuntu instead.
Development version installation
Why? To unlock new features that are not yet in the Main version.
wget -O-  https://pathos.tanatos.org/proxysmart.apt.repo/GPG.txt | \
    gpg --dearmor | sudo dd of=/etc/apt/trusted.gpg.d/proxysmart.gpg

source /etc/os-release
ARCH=$(dpkg --print-architecture)

echo "deb [arch=$ARCH] http://pathos.tanatos.org/proxysmart.apt.repo.dev $VERSION_CODENAME main" \
    | sudo tee /etc/apt/sources.list.d/proxysmart.list

sudo apt update
sudo apt install proxysmart
sudo /usr/lib/proxysmart/install_pkgs.sh
sudo /usr/lib/proxysmart/install_webapp.sh
Reboot or run sudo proxysmart.sh reset_complete.
2. Upgrade
Run these commands:
NOTE when dpkg will ask whether to replace old config file with new one, answer N (No) or just press Enter.
So old config file is saved.
sudo -i
wget -O-  https://pathos.tanatos.org/proxysmart.apt.repo/GPG.txt | gpg --dearmor | dd of=/etc/apt/trusted.gpg.d/proxysmart.gpg
apt update
apt install proxysmart
/usr/lib/proxysmart/install_pkgs.sh
/usr/lib/proxysmart/install_webapp.sh
Reboot or run sudo proxysmart.sh reset_complete.
3. Post Installation
Plug in all 4g modems you have, wait ~20 sec to let them initialize.
Now test if ip li shows you any modem* interfaces, otherwise reboot to apply UDEV rules.
If it does, continue next below. (Otherwise reboot to apply UDEV rules.)
Now you can start all the modems:
You have to run proxysmart.sh reset_complete or reboot the multi-modem server.
Command proxysmart.sh show_status will return a table with proxy port, external IP’s.
Navigate to the WebApp http://localhost:8080 proxy/proxy and assign login/password/nicknames/ports to the modems.
Test reboot, reboot the box, wait 1 minute, make sure the WebApp shows the modems.
WebApp
Visit http://your_box_lan_IP_address:8080/ or http://localhost:8080/
Default user:password pair is proxy:proxy
4. Cloud VPS integration.
Why? The VPS is needed to forward proxy ports from a cloud VPS IP back to the multi modem server, so proxy ports are available for all users around the world.
Do I need a VPS?
A VPS is NOT needed when all the conditions are met:
- you have static IP at 4g proxy farm location, i.e. ISP provides it, and
- ISP allows incoming connections to that static IP
- Upload and Download of “ground” Internet is at least 20 Mbps.
Without a VPS, you can forward proxy ports on your Home/Office router to multi-modem server in the LAN. In that case users from around the world will connect to your static IP, so these connections are forwarded to the 4g farm server situated in the LAN.
The VPS server can be a cheap 1GB DigitalOcean / Linode / Vultr VPS or similar.
It has to be located as close as possible to the 4g farm server ( for lowest ping ).
VPS setup steps.
On multi modem server
Copy content from the file /root/.ssh/fwd.pub [1]
On VPS
Check if your VPS has no firewall. Disable it if it has – Both inside Linux OS and in hoster panel.
Create a user fwd , run :
useradd -s /bin/true -m fwd
usermod -p '*' fwd
mkdir -p /home/fwd/.ssh/
touch /home/fwd/.ssh/authorized_keys
chown -R fwd: /home/fwd/
chmod 700 /home/fwd/.ssh/
chmod 600 /home/fwd/.ssh/authorized_keys
Adjust SSH server configuration, run :
mkdir -p /etc/ssh/sshd_config.d
echo '
GatewayPorts clientspecified
ClientAliveInterval 3
ClientAliveCountMax 3
MaxStartups 100:30:1000
LoginGraceTime 10
' > /etc/ssh/sshd_config.d/proxysmart.conf

service ssh restart
edit the file and paste the content [1] you copied in the step above. It is public part of fwd.ssh key that is used for communication from Proxysmart to VPS.
nano /home/fwd/.ssh/authorized_keys
Save the file (press Control O) and exit the editor (Control x)
On multi modem server
in /etc/proxysmart/conf.txt :
- set
VPSvariable to VPS IP - set
PROXY_PORTS_FORWARDER_ENABLE=1 - run
proxysmart.sh reset_complete - edit
/etc/systemd/system/fwdssh-vps.service, changeCONNECT_HOSTto VPS IP - Pick a free port for
SSH_REMOTE_PORT, in most cases 6902 is fine. - Pick a free port for
WEB_REMOTE_PORT, in most cases 8080 is fine.
Run:
systemctl daemon-reload
systemctl start fwdssh-vps
systemctl enable fwdssh-vps
systemctl status fwdssh-vps
Make sure it is green.
On VPS
issue the command ss -tnlp and you will see proxy ports are bound with sshd daemon. That means the ports are forwarded.
On your private desktop or any other PC
- visit
http://vps_ip:8080for the WebApp , default login:password is proxy:proxy - you can ssh to VPS IP and port 6902, and that goes to the multi-modem-server:22.
Cloud VPS IP change
If CLoud VPS IP is changed, update it on multi-modem-server side by defining new VPS variable in the /etc/proxysmart/conf.txt file, and rerun proxysmart.sh reset_complete there.
Also change VPS IP in /etc/systemd/system/fwdssh-vps.service on multi-modem-server and run these:
systemctl daemon-reload
systemctl restart fwdssh-vps
systemctl status fwdssh-vps
Make sure it is green.
5. Forwarding ports through your own LAN router.
Why? It is needed to forward proxy ports from a your ISP IP address back to the multi modem server, so proxy ports are available for all users around the world.
It is suitable when all the conditions are met:
- you have static IP at 4g proxy farm location, i.e. ISP provides it, and
- ISP allows incoming connections to that static IP
- Upload and Download of “ground” Internet is at least 20 Mbps.
Without a VPS, you can forward proxy ports on your Home/Office router to multi-modem server in the LAN. In that case users from around the world will connect to your static IP, so these connections are forwarded to the 4g farm server situated in the LAN.
Steps
Consult with documentation of your LAN router. Forward these ports from ISP IP address to the LAN IP of proxysmart server:
- TCP 8001-8999 for HTTP proxies
- TCP 5001-5999 for SOCKS5 pproxies
- TCP 8080 for the WebApp
- TCP 1194 for Openvpn (if it is working in TCP mode)
- UDP 1194 for Openvpn (if it is working in UDP mode)
Notes
Also edit /etc/proxysmart/conf.txt . Replace myrouter.com with your actual Hostname or IP addresss.
So proxy credentials & links will be shown with your actual Hostname or IP addresss.
PROXY_PORTS_FORWARDER_ENABLE=0
REWRITE_WEBAPP_URL=1
REWRITE_WEBAPP_TO="http://myrouter.com:8080"
REWRITE_HOST_IN_PROXY_CREDS=1
REWRITE_HOST_IN_PROXY_CREDS_TO="myrouter.com"
run
systemctl disable --now gost_forward_vpn
systemctl disable --now fwdssh-vps
.. so forwarding system ports to a VPS is disabled.
Then finally reconfigure the system by running proxysmart.sh reset_complete .
7. License
1. Demo license
Installation is shipped with default demo license.
It allows you to run proxy on 1 modem.
In order to run more modems, buy a License.
2. Requesting a License
2.1. Get the machine data
Method1. From the WebApp:
- Open the proxysmart WebApp at http://localhost:8080 or http://LAN_IP:8080
- Expand License section
- Copy machine_data value
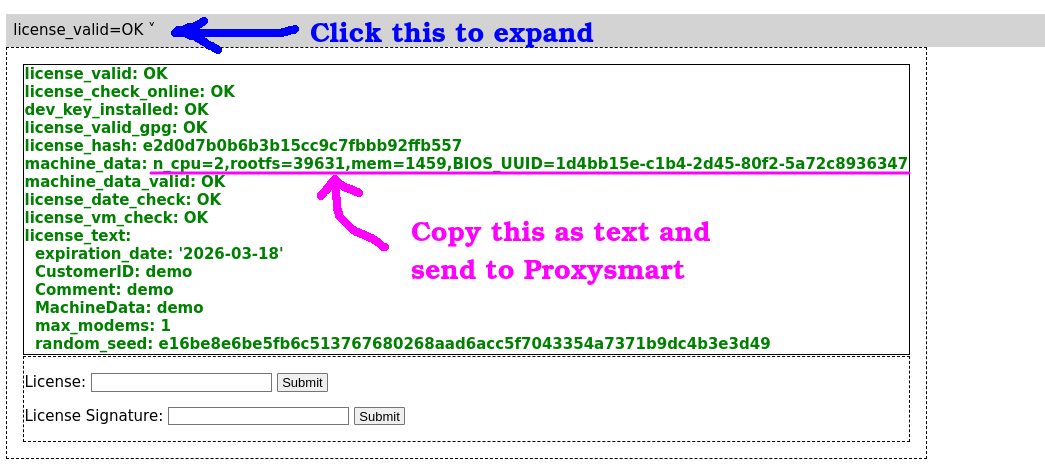
Method2. From the CLI:
- Open terminal
- Run sudo proxysmart.sh license_status
- Copy machine_data value
2.2. Contact Sales Team
Send the copied value to proxysmart.org
2. License installation
You will be given the license and license signature. Both are sequences of numbers and characters. Then submit both either via WebApp or CLI:
submitting via WebApp
Open the WebApp , http://localhost:8080 , expand License section and type in the keys & submit both.
submitting via CLI
run commands
proxysmart.sh submit_license LICENSE
proxysmart.sh submit_license_signature LICENSE_SIGNATURE
3. Restoring Demo license.
If your paid license expired or broken, restore DEMO license, run:
sudo cp -v /usr/share/doc/proxysmart/examples/license.txt* /etc/proxysmart/
8. Mobile (4G/5G) VPN
Together with building proxies, it is possible to build Residential VPN.
Assumption is, your proxies are already available via Cloud VPS.
8.1 Installation
8.1.1 Installation with TCP protocol (through VPS)
If ports forwarded through a VPS
Steps on VPS
Assume the VPS is already “integrated” - see VPS integration topic.
Pick a free TCP port on the VPS, run ss -tnlp on the VPS and it will show USED ports, so pick up a free one e.g. 1501. We will call it OPENVPN_REMOTE_PORT.
Steps on Proxysmart server
- edit
/etc/systemd/system/fwdssh-vps.service - uncomment and set
Environment=OPENVPN_LOCAL_PORT=1194 - uncomment and set
Environment=OPENVPN_REMOTE_PORT=1501, to theOPENVPN_REMOTE_PORTfrom the step above. - edit
/etc/proxysmart/conf.txtand setOPENVPN_SERVER_PORT=1501, to theOPENVPN_REMOTE_PORTfrom the step above. - set
OPENVPN_INTEGRATION=1
So VPN client certificates will be generated with this value, so VPN clients will connect there ( $VPS_IP:$OPENVPN_REMOTE_PORT/TCP )
systemctl daemon-reload
systemctl restart fwdssh-vps
This just enabled port forwarding of TCP port OPENVPN_REMOTE_PORT to localhost:OPENVPN_LOCAL_PORT.
Then run /usr/lib/proxysmart/install_openvpn.sh , it will do the installation of Openvpn server.
Check if /etc/openvpn/server.conf has proto tcp otherwise set it there.
Check if /etc/openvpn/client.ovpn.template has proto tcp and proper remote (with VPS IP and OPENVPN_SERVER_PORT) otherwise set it there.
Then finally reconfigure the system by running proxysmart.sh reset_complete . For each modem it will generate a VPN profile.
Restart proxysmart WebApp so it shows a web link for downloading the profiles systemctl restart proxysmart .
You can download them later as from the WebApp at http://localhost:8080/vpn_profiles/ or grab from /home/vpn/ folder.
8.1.2. Installation with TCP protocol (through LAN router)
If ports forwarded through the LAN router
Steps on LAN router
Your external IP of the LAN router is $EXT_IP .
You forwarded TCP port 1194 to the LAN IP of the Proxysmart server. We will call it OPENVPN_SERVER_PORT.
Steps on Proxysmart server
- edit
/etc/proxysmart/conf.txtand setOPENVPN_SERVER_PORT=1194, to theOPENVPN_SERVER_PORTfrom the step above. - set
OPENVPN_INTEGRATION=1
So VPN client certificates will be generated with this value, so VPN clients will connect there ( $EXT_IP:$OPENVPN_SERVER_PORT/TCP )
Then run /usr/lib/proxysmart/install_openvpn.sh , it will do the installation of Openvpn server.
Check if /etc/openvpn/server.conf has proto tcp otherwise set it there.
Check if /etc/openvpn/client.ovpn.template has proto tcp and proper remote (with $EXT_IP and OPENVPN_SERVER_PORT ) otherwise set it there.
Then finally reconfigure the system by running proxysmart.sh reset_complete . For each modem it will generate a VPN profile.
Restart proxysmart WebApp so it shows a web link for downloading the profiles systemctl restart proxysmart .
You can download them later as from the WebApp at http://localhost:8080/vpn_profiles/ or grab from /home/vpn/ folder.
8.1.3. Installation with UDP protocol (through VPS)
8.1.4. Installation with UDP protocol (through LAN router)
8.2. Extra profiles for a modem
If you need 2 extra VPN profiles for a dongle dongle1 , run openvpn_create_user dongle1@a or openvpn_create_user dongle1@b .
8.3. Mobile VPN, how to connect
So download the VPN profiles and connect using any VPN client software.
- Download and install software:
Windows: https://openvpn.net/community-downloads/ or https://openvpn.net/client-connect-vpn-for-windows/
MacOS: https://tunnelblick.net/
Android: https://play.google.com/store/apps/details?id=de.blinkt.openvpn or https://f-droid.org/en/packages/de.blinkt.openvpn/
IOS: https://apps.apple.com/us/app/openvpn-connect/id590379981
- Import downloaded OpenVPN profile, tap Connect.
- use Login and Password from the corresponding proxy.
8.4. Many users with the same profile
By default only 1 device (PC, mobile, tablet) can use 1 OpenVPN profile. If you want multiple devices use 1 profile, edit /etc/openvpn/server.conf , comment out ;duplicate-cn line by removing the ; character, and run proxysmart.sh reset_complete.
8.5. Mobile VPN logs
Logs of openvpn sessions - /var/log/openvpn/sessions.log. Format:
'$time','$type','$local_port','$proto','$duration','$bytes_in','$bytes_out','$Real_IP','$Real_PORT','$Ovpn_CERT','$Ovpn_IP','$IMEI','$proxy_login','$auth_reject_why'
- type - session_start / session_stop / auth_reject
- local_port - local port of Openvpn server
- proto - tcp-server or udp
- duration - when type is session_stop, how many the session lasted
- Real_IP, Real_PORT - of a client
- auth_reject_why - when type is session_stop, the reason why auth was rejected
9. Bugs and Limitations
LTE modules
- IPV6 is not fully supported
LAN routers
- IPV6 is not fully supported
Openvpn profiles
- Bandwidth quotas don’t apply to Openvpn users